Claude Mermaid MCP Server
MCP server for rendering Mermaid diagrams in Claude Code with live reload functionality and a built-in skill for expert guidance.
Automatically renders diagrams in your browser with real-time updates as you refine them. Perfect for iterative diagram development and documentation workflows.
✨ Features
- 🔄 Live Reload - Diagrams auto-refresh in your browser as you edit
- 🎨 Multiple Save Formats - Export to SVG, PNG, or PDF
- 🌈 Themes - Choose from default, forest, dark, or neutral themes
- 📐 Customizable - Control dimensions, scale, and background colors
- 🪄 Interactive Preview - Pan diagrams by dragging, zoom with browser controls, reset position with one click
- ⬇️ Browser Export - Download diagrams as SVG or PNG directly from the preview
- 🗂️ Multiple Previews - Use
preview_id to work on multiple diagrams simultaneously
- 💾 Persistent Working Files - Live previews are stored under
~/.config/claude-mermaid/live
- 🤖 Built-in Skill - Includes a Claude skill with best practices and expert guidance for creating diagrams
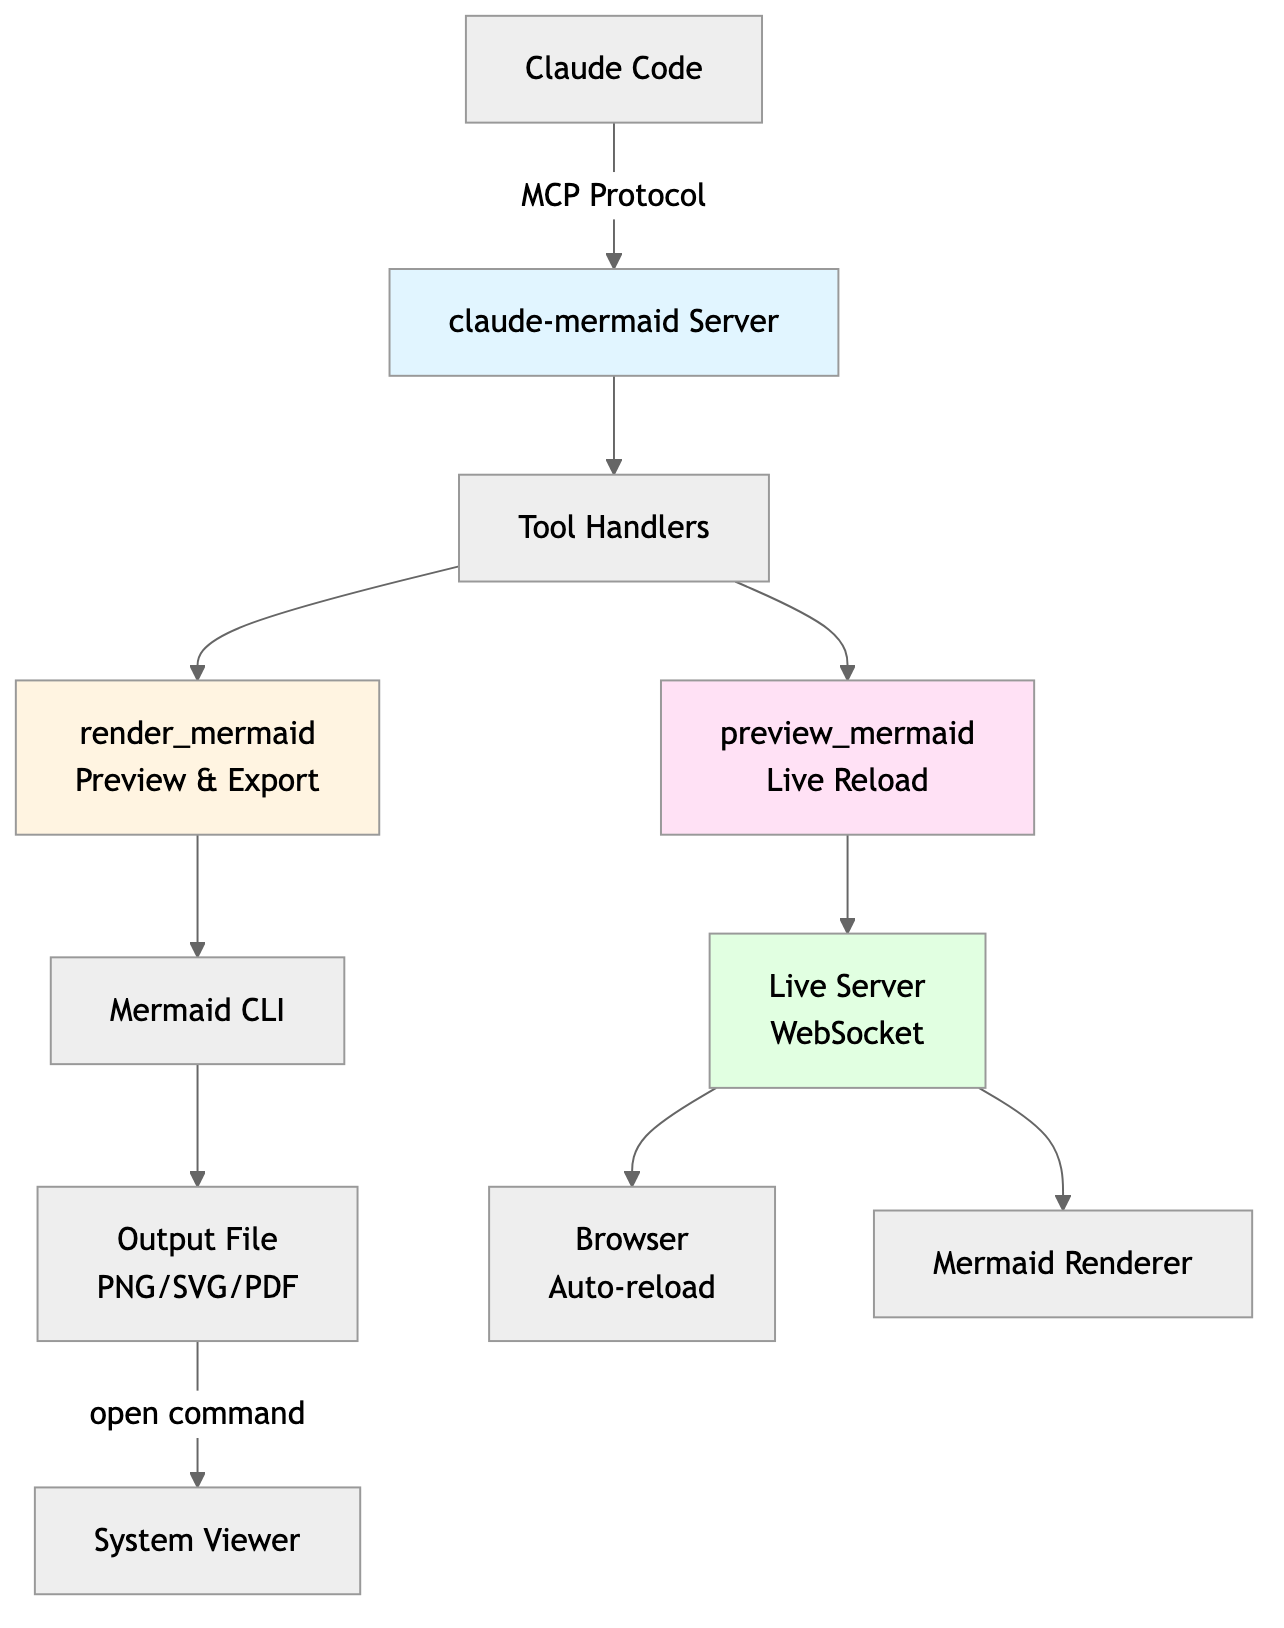
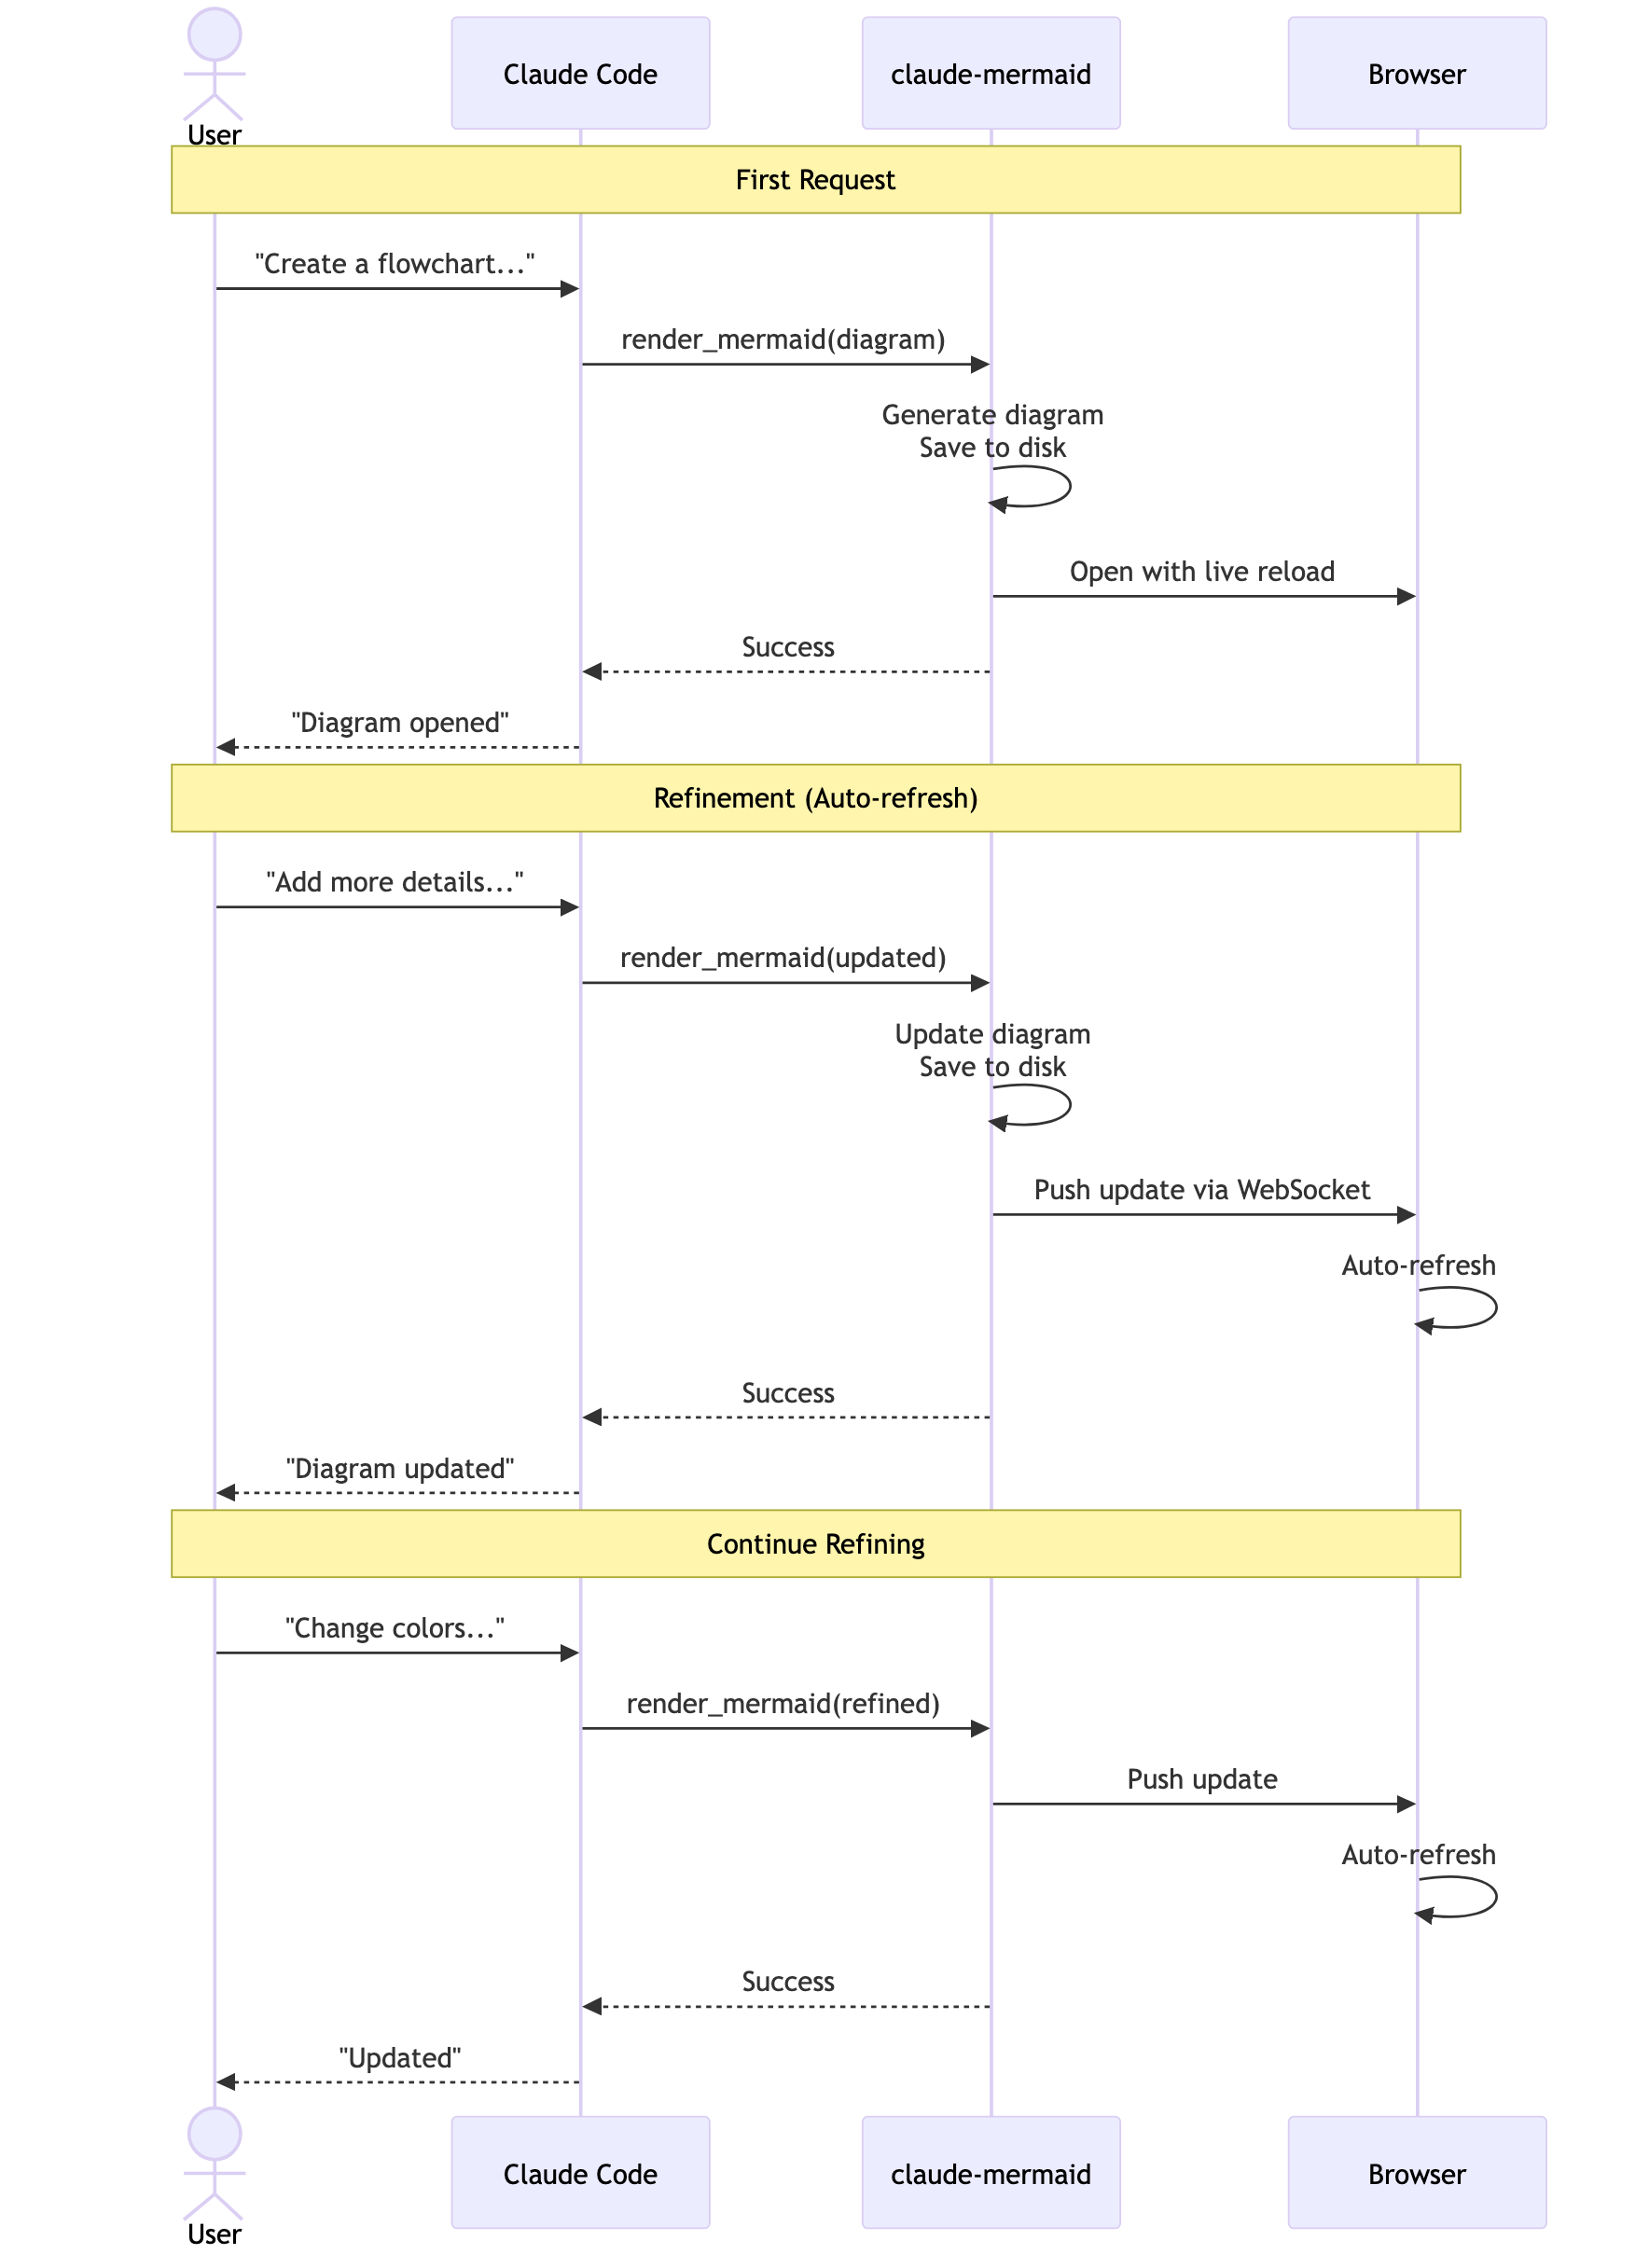
Architecture
Project Architecture Diagram
User Workflow Diagram
Dependencies Diagram

🚀 Quick Start
1. Install
Plugin Install (Recommended)
In Claude Code, add the marketplace and install the plugin:
/plugin marketplace add veelenga/claude-mermaid
/plugin install claude-mermaid@claude-mermaid
Then restart Claude Code to activate the plugin.
From npm:
npm install -g claude-mermaid
From source:
git clone https://github.com/veelenga/claude-mermaid.git
cd claude-mermaid
npm install && npm run build && npm install -g .
2. Verify Installation
Plugin install: The MCP server is configured automatically. Just verify:
/mcp
You should see mermaid in the MCP server list.
npm install: Configure the MCP server manually:
claude mcp add --scope user mermaid claude-mermaid
Then verify:
claude mcp list
You should see mermaid: claude-mermaid - ✓ Connected
🔌 Other MCP Client Configurations
While this server is optimized for Claude Code, it can work with any MCP-compatible client. Here's how to configure it for other popular tools:
Codex
Add to your Codex MCP settings file (~/.codex/mcp_settings.json):
{
  "mcpServers": {
    "mermaid": {
      "command": "claude-mermaid"
    }
  }
}
Or configure via Codex CLI:
codex mcp add mermaid claude-mermaid
Cursor
Add to your Cursor MCP config file (.cursor/mcp.json or settings):
{
  "mcpServers": {
    "mermaid": {
      "command": "claude-mermaid"
    }
  }
}
Or use Cursor's settings UI:
- Open Cursor Settings (Cmd/Ctrl + ,)
- Navigate to MCP Servers
- Add a new server with command:
claude-mermaid
VSCode with Cline Extension
If using the Cline extension for VSCode:
- Open VSCode settings (Cmd/Ctrl + ,)
- Search for "Cline MCP"
- Add to MCP Settings JSON:
{
  "mcpServers": {
    "mermaid": {
      "command": "claude-mermaid"
    }
  }
}
Windsurf
Add to Windsurf's MCP configuration file:
{
  "mcpServers": {
    "mermaid": {
      "command": "claude-mermaid"
    }
  }
}
Configuration location varies by platform:
- macOS:
~/Library/Application Support/Windsurf/mcp.json
- Linux:
~/.config/windsurf/mcp.json
- Windows:
%APPDATA%\Windsurf\mcp.json
Gemini CLI
Add to Gemini CLI's MCP configuration file (~/.gemini/mcp.json):
{
  "mcpServers": {
    "mermaid": {
      "command": "claude-mermaid"
    }
  }
}
Or use the Gemini CLI to configure:
gemini config mcp add mermaid --command claude-mermaid
Other MCP Clients
For any MCP-compatible client, use the standard configuration:
{
  "mcpServers": {
    "mermaid": {
      "command": "claude-mermaid"
    }
  }
}
The command claude-mermaid should be available in your PATH after installation.
Note: Some clients may require the full path to the executable:
'%20stop-opacity%3D'0.16'%2F%3E%3Cstop%20offset%3D'1'%20stop-color%3D'rgb(200%2C90%2C60)'%20stop-opacity%3D'0.03'%2F%3E%3C%2FlinearGradient%3E%3C%2Fdefs%3E%3Crect%20width%3D'320'%20height%3D'200'%20fill%3D'url(%23g)'%2F%3E%3Ccircle%20cx%3D'250'%20cy%3D'56'%20r%3D'92'%20fill%3D'rgb(200%2C90%2C60)'%20fill-opacity%3D'0.06'%2F%3E%3Ccircle%20cx%3D'64'%20cy%3D'172'%20r%3D'58'%20fill%3D'rgb(200%2C90%2C60)'%20fill-opacity%3D'0.05'%2F%3E%3C%2Fsvg%3E)